This guide breaks down exactly what goes into a construction bid proposal, section by section, with examples of what to write and common mistakes that get bids rejected. We’ll cover the standard format that works for commercial and government projects, plus how to adapt it for residential work where the structure is more flexible but the fundamentals stay the same.
The 8 Core Sections of Every Construction Bid Proposal
Every bid proposal needs these sections. The depth and order vary by project type, but skip any of these and you either get disqualified or look like you don’t know what you’re doing.
1. Cover Letter
The cover letter is your 30-second pitch. It’s not a formality—it’s where you prove you’re not mass-submitting the same boilerplate to every project. The client wants to know: Do you understand what we’re asking for, and why should we keep reading?
What to include:
- Project name and RFP or bid number (match it exactly as listed in the solicitation)
- One or two sentences summarizing your understanding of the scope
- Why you’re the right fit—relevant experience, local presence, specialized capabilities
- Your total bid amount (unless the RFP says not to include it here)
- Your contact info and availability for follow-up questions
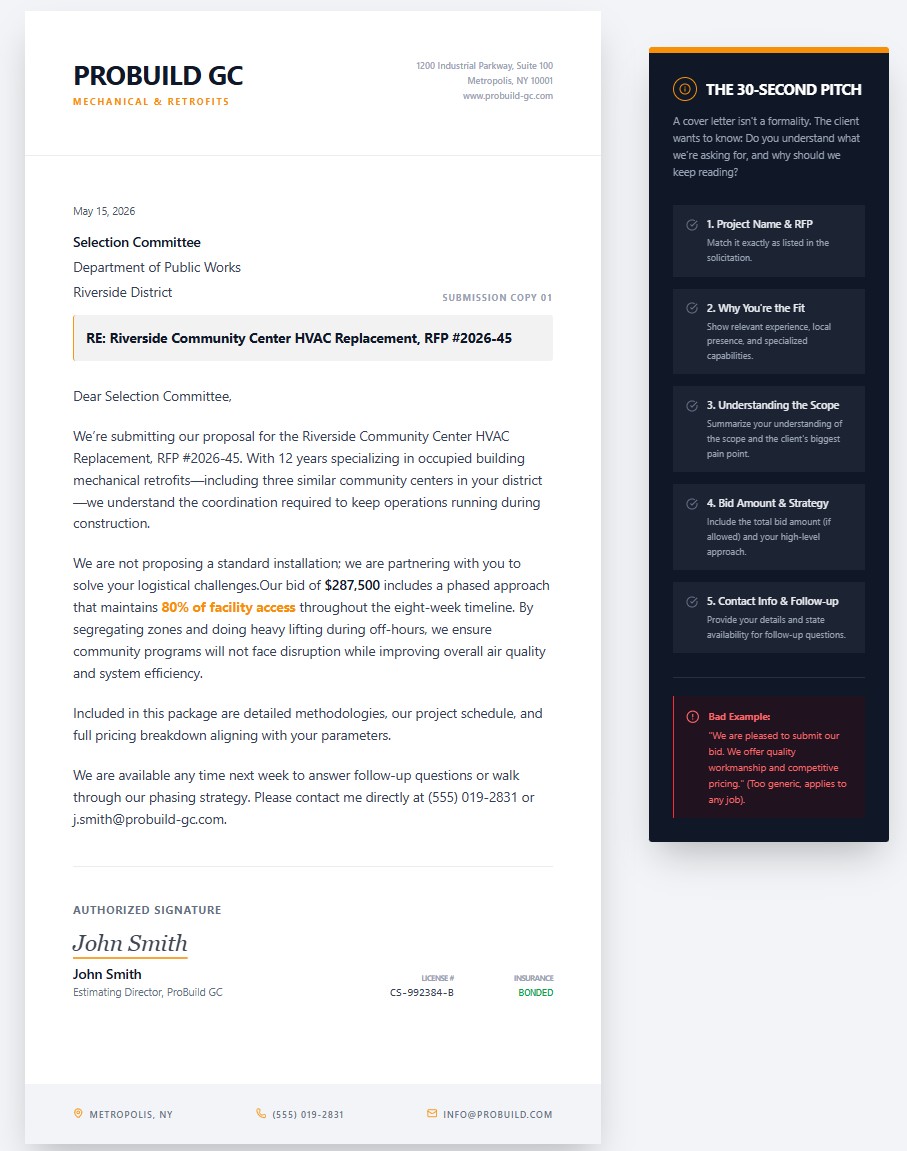
Example: “We’re submitting our proposal for the Riverside Community Center HVAC Replacement, RFP #2026-45. With 12 years specializing in occupied building mechanical retrofits—including three similar community centers in your district—we understand the coordination required to keep operations running during construction. Our bid of $287,500 includes a phased approach that maintains 80% of facility access throughout the eight-week timeline.”
That’s specific. It shows you read the RFP, you’ve done this before, and you’ve already thought about the biggest pain point (keeping the building open). A bad cover letter says: “We are pleased to submit our bid for your project. We offer quality workmanship and competitive pricing.” That could apply to any job, anywhere.
2. Company Overview and Qualifications
This section proves you’re capable and credible. Don’t write a company history essay. The client doesn’t care that you started in your uncle’s garage in 1998. They care whether you’ve successfully completed work like theirs, with proof.
What to include:
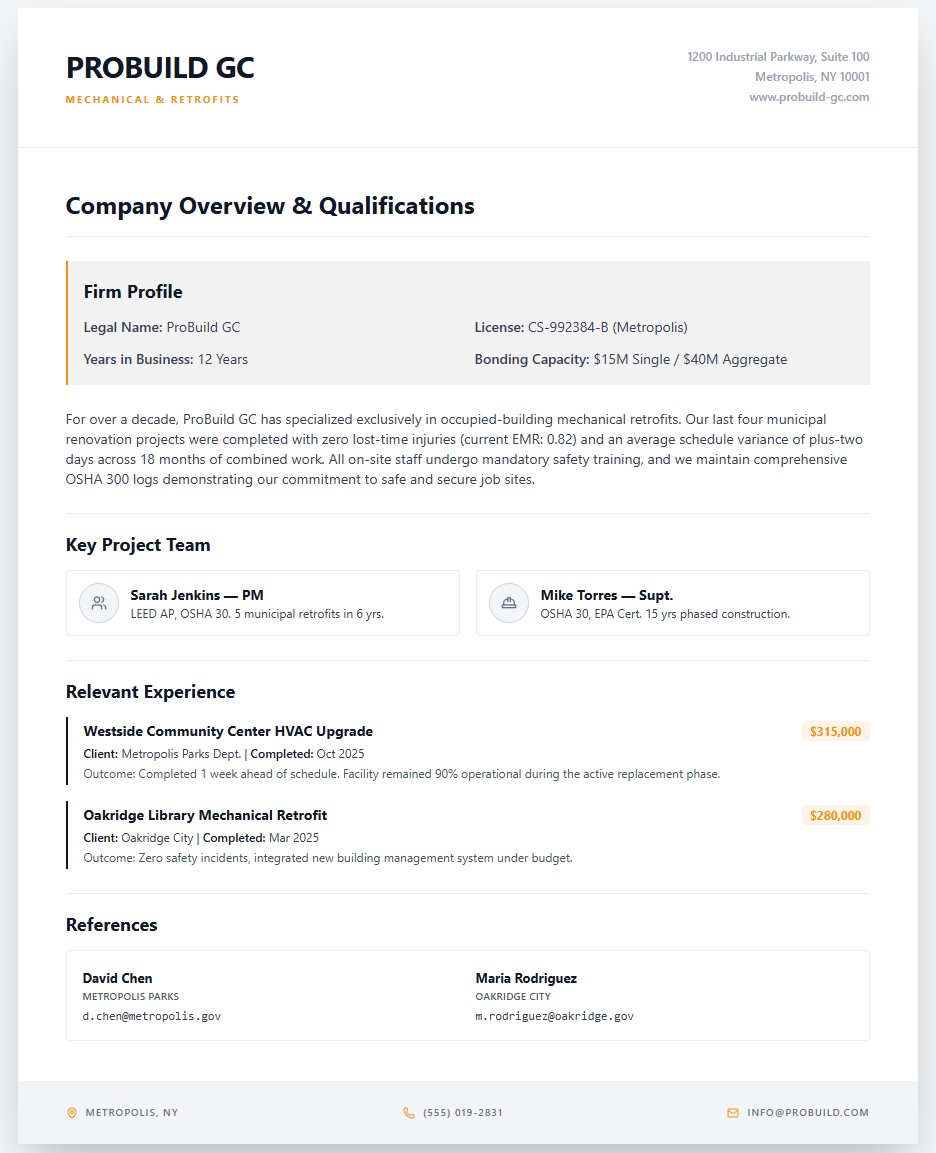
- Company name, contractor license number, bonding capacity
- Years in business, with emphasis on experience relevant to this project type
- Three to five similar completed projects: client name, project value, completion date, key outcomes (on-time delivery, safety record, under budget)
- Key personnel who’ll work on this job—project manager, superintendent—with certifications and relevant experience
- Safety record: your EMR (Experience Modification Rate), recent OSHA 300 log summary, safety training programs
- References with contact information (get permission first)
What to avoid: Generic claims. “We deliver quality and value” means nothing. Replace it with something like: “Our last four school renovation projects were completed with zero lost-time injuries and an average schedule variance of plus-two days across 18 months of combined work.”
Numbers and specifics build credibility. Adjectives don’t.
3. Scope of Work and Project Understanding
This is where most bids either win or die. The client wants to see that you understand what they’re actually asking for—and that you’ve spotted problems or complexities they might have missed. A good scope section proves you’ve read the plans, walked the site, and thought through the sequencing.
What to include:
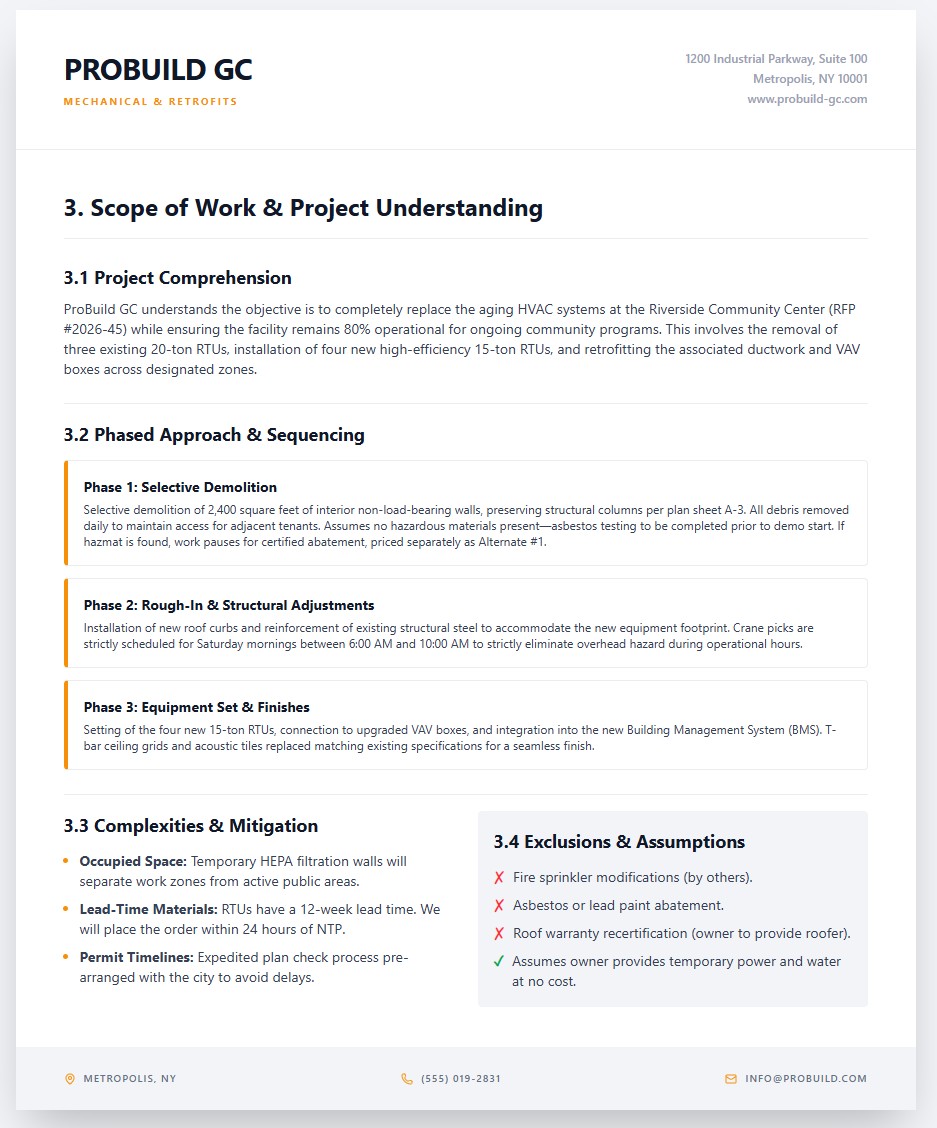
- Restate the project in your own words to prove comprehension
- Break the scope into major phases or work areas (demolition, rough-in, finishes, etc.)
- Highlight complexities you’ve identified—access constraints, coordination with occupied spaces, permit timelines, lead-time materials
- State your approach to solving those challenges
- List exclusions clearly—what’s NOT included in your price
- Note assumptions you’re making (e.g., “Assumes owner provides temporary power and water”)
Example of specificity: Instead of writing “Demolish existing structure,” say: “Selective demolition of 2,400 square feet of interior non-load-bearing walls, preserving structural columns per plan sheet A-3. All debris removed daily to maintain access for adjacent tenants. Assumes no hazardous materials present—asbestos testing to be completed prior to demo start. If hazmat is found, work pauses for certified abatement, priced separately as Alternate #1.”
That tells the client you’ve read the drawings, you know there are tenants next door, and you’re not going to surprise them with a change order for asbestos you should have anticipated.
Exclusions matter just as much as inclusions. If you’re pricing a kitchen remodel and your bid doesn’t include appliances, countertops, or plumbing fixtures because those are owner-supplied, say so. Spell it out. Clients assume everything is included unless you explicitly exclude it.
4. Cost Breakdown
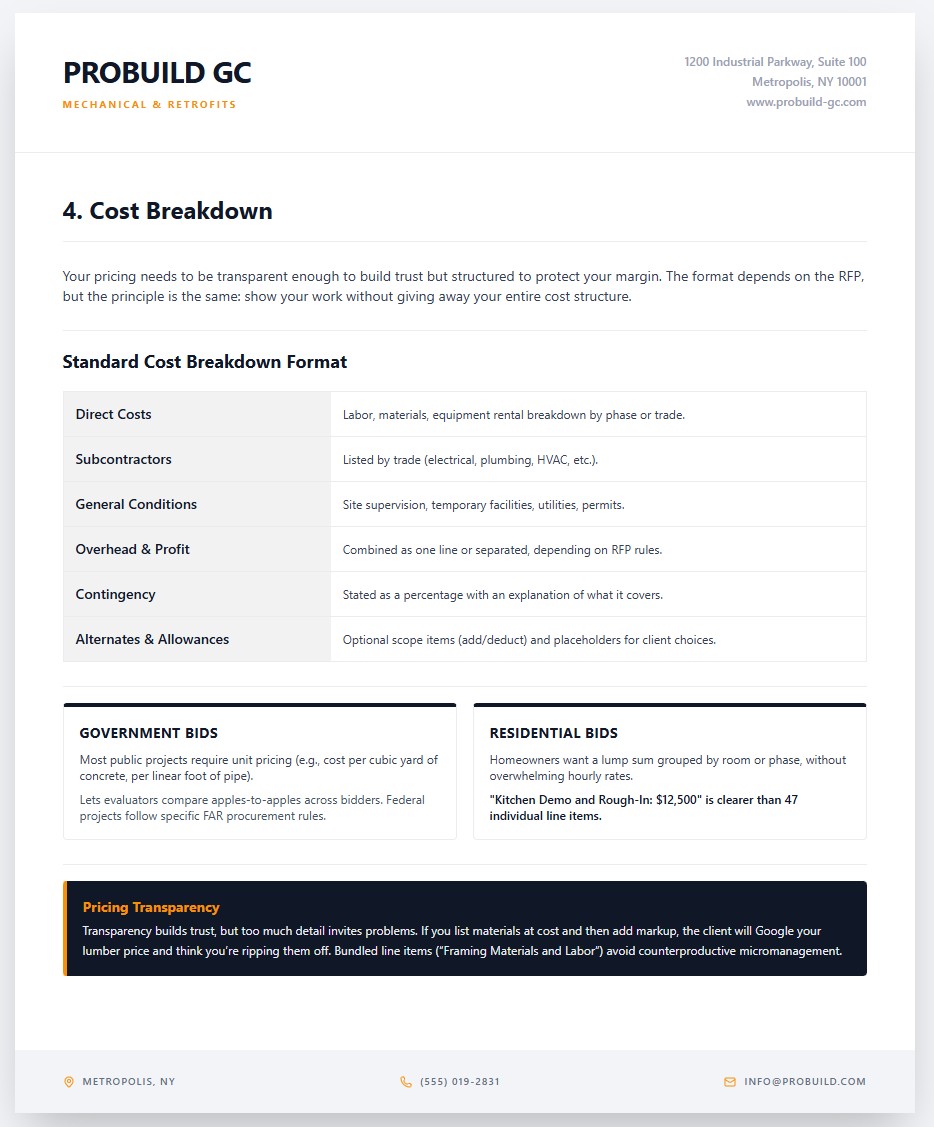
Your pricing needs to be transparent enough to build trust but structured to protect your margin. The format depends on the RFP, but the principle is the same: show your work without giving away your entire cost structure.
Standard cost breakdown format:
- Direct costs by phase or trade: Labor, materials, equipment rental
- Subcontractor costs: Listed by trade (electrical, plumbing, HVAC, etc.)
- General conditions: Site supervision, temporary facilities, utilities, permits
- Overhead and profit: Can be combined as one line or separated, depending on RFP requirements
- Contingency: If the client allows it, state it as a percentage and explain what it covers
- Alternates: Optional scope items priced separately (add/deduct options)
- Allowances: Placeholder amounts for items the client hasn’t selected yet (like light fixtures or flooring)
Government bids: Most public projects require unit pricing—cost per cubic yard of concrete, per square foot of roofing, per linear foot of pipe. This lets evaluators compare apples-to-apples across bidders and adjust quantities if the scope changes. Federal projects follow specific procurement rules outlined by the Federal Acquisition Regulation (FAR).
Residential bids: Homeowners don’t need to see your hourly labor rate for every trade. They want a lump sum with enough detail to understand what they’re paying for but not so much that they’re comparison-shopping every item. Group costs by room or phase: “Kitchen Demo and Rough-In: $12,500” is clearer than 47 line items. For more on residential estimating, see our guide on creating accurate construction estimates.
Transparency builds trust, but too much detail invites problems. If you list materials at cost and then add markup, the client will Google your lumber price and think you’re ripping them off. Bundled line items (“Framing Materials and Labor”) avoid that.
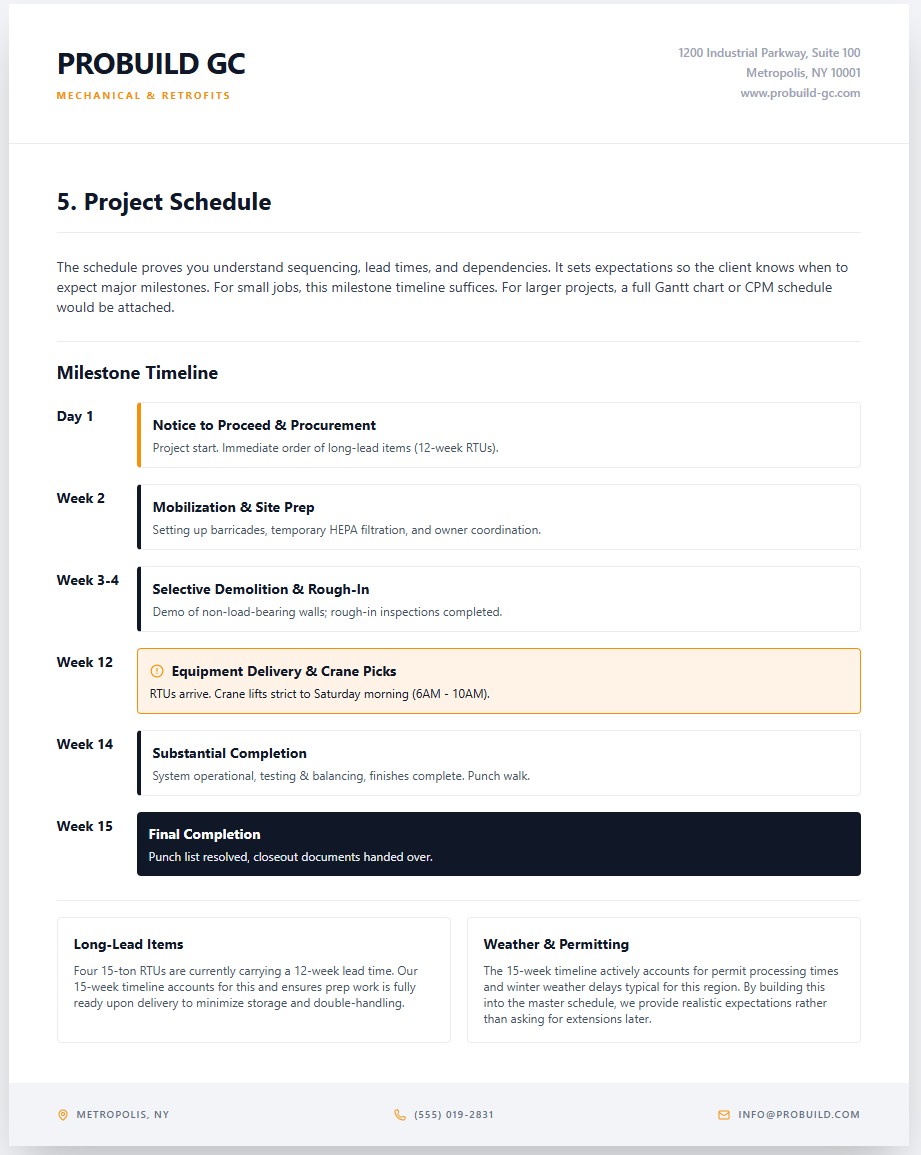
5. Project Schedule
The schedule proves you understand sequencing, lead times, and dependencies. It also sets expectations so the client knows when to expect major milestones. For small jobs, a simple milestone timeline works. For larger or complex projects, submit a Gantt chart or CPM (Critical Path Method) schedule if you have the software.
What to include:
- Project start date (or “10 days after Notice to Proceed” if the NTP timing is flexible)
- Major milestones with durations (mobilization, foundation complete, rough-in inspections, finishes start, substantial completion)
- Long-lead procurement items flagged—anything that requires ordering weeks in advance
- Substantial completion date and final completion date
- Weather or seasonal considerations if relevant
- Coordination points with the owner or other trades
Build in buffer without calling it contingency. Instead of “8-week timeline plus 2-week weather buffer,” say: “10-week timeline accounting for permit processing and winter weather delays typical for this region.” That sounds like planning, not padding.
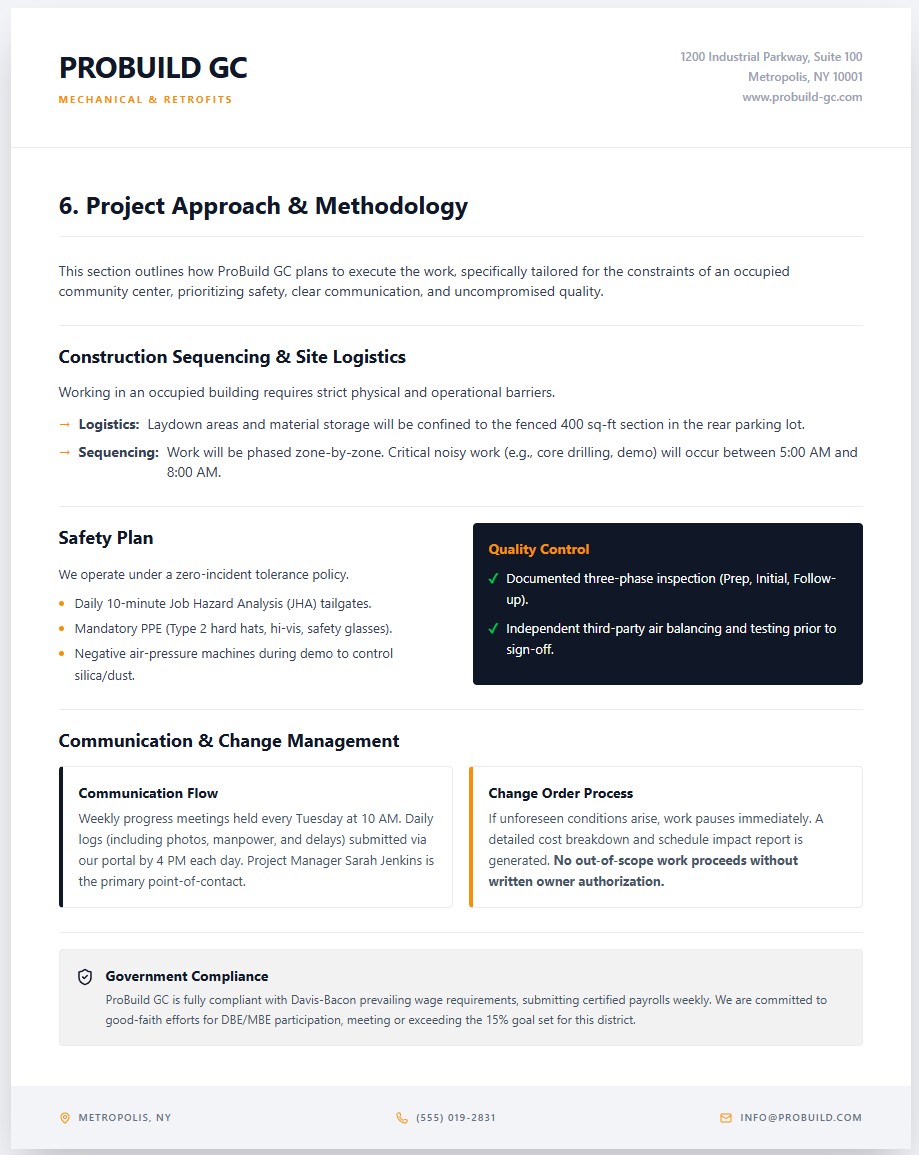
6. Project Approach and Methodology
This section answers the question: How will you actually execute the work? What’s your plan when problems show up? It’s where you separate yourself from contractors who just list tasks and pricing.
What to include:
- Construction sequencing and site logistics—especially critical for occupied buildings or tight urban sites with limited staging
- Safety plan summary highlighting site-specific hazards you’ve identified and how you’ll mitigate them
- Quality control process: inspection points, testing protocols, documentation you’ll provide
- Communication plan: frequency of meetings, daily reports, who the owner contacts with questions
- Change order process: how you’ll handle unforeseen conditions, what approvals you need before proceeding
- Site cleanup and final turnover procedures
For residential projects: Homeowners care about daily work hours, noise mitigation, dust control, where your crews will park, whether they can use the bathroom. Address these upfront. It shows respect and professionalism.
For government projects: Reference compliance with Davis-Bacon prevailing wage requirements, Buy American provisions if applicable, and DBE/MBE (Disadvantaged/Minority Business Enterprise) participation goals. If the RFP requires it, include your plan with proof—letters from subcontractors, certifications. Learn more about Davis-Bacon compliance requirements.
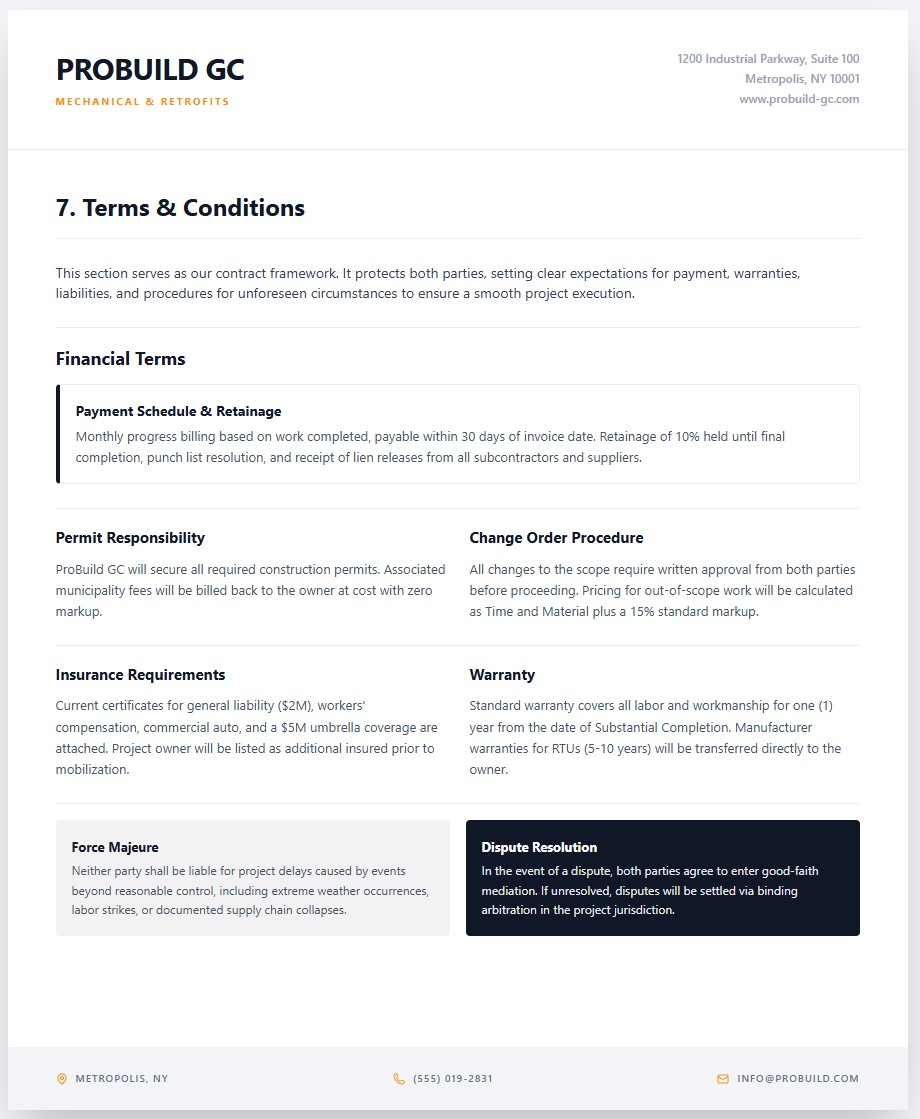
7. Terms and Conditions
This section is your contract framework. It protects both parties and sets clear expectations for payment, warranties, liability, and what happens when things don’t go as planned.
What to include:
- Payment terms: Progress billing schedule (monthly based on percentage complete), retainage percentage (typically 5-10%), final payment conditions
- Warranty: Standard is one year from substantial completion, but state it explicitly and clarify what’s covered
- Insurance requirements: Attach current certificates for general liability, workers compensation, auto, and umbrella coverage. List the project owner as additional insured if required
- Permit responsibility: Who pulls permits? Who pays fees? Be clear
- Change order procedure: All changes require written approval. Pricing method—time and material with markup percentage, or fixed-price quote
- Force majeure: What happens if work stops due to events beyond anyone’s control (extreme weather, strikes, supply chain collapse)
- Dispute resolution: Mediation, arbitration, or litigation—spell out the process
Avoid vague payment terms. “Net 30” doesn’t cut it in construction. Say: “Monthly progress billing based on work completed, payable within 30 days of invoice date. Retainage of 10% held until final completion, punch list resolution, and receipt of lien releases from all subcontractors and suppliers.” For state-specific retainage rules, see our guide on construction retainage laws by state.
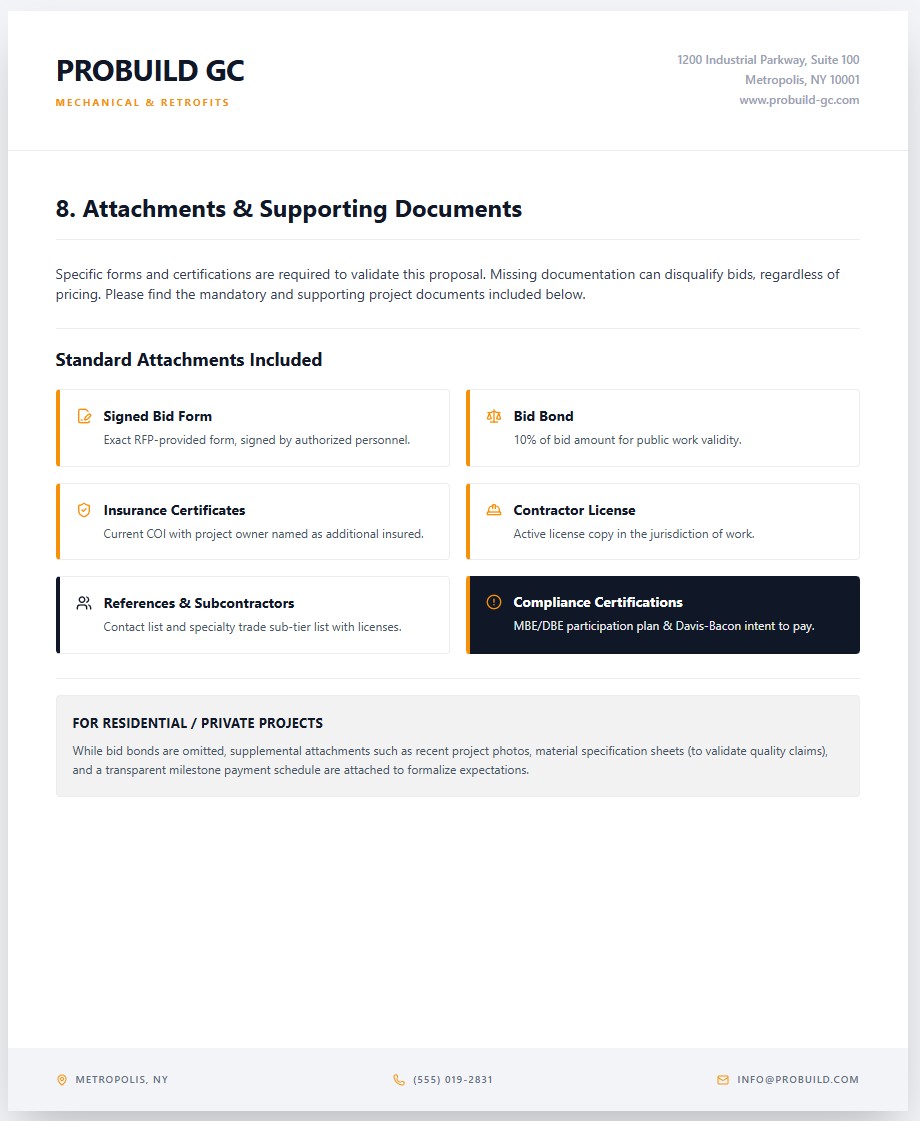
8. Attachments and Supporting Documents
Government and commercial bids require specific forms and certifications. Missing even one can disqualify your bid, even if you’re the lowest price.
Standard attachments:
- Signed bid form (if the RFP provides one, use it exactly as formatted—don’t recreate it in Word)
- Bid bond (typically 5-10% of your bid amount for public work)
- Insurance certificates (current, with correct coverage limits and the project owner named as additional insured)
- Contractor license (copy of your active license in the jurisdiction where the work is happening)
- References (letters or a contact list with names, phone numbers, emails)
- Subcontractor list with license numbers if the RFP requires it
- MBE/DBE participation plan if the project has goals
- Prevailing wage compliance statement for Davis-Bacon or state prevailing wage projects
For residential bids: You don’t need bid bonds, but include recent project photos, material spec sheets for major items (to back up quality claims), and a payment schedule that breaks down deposits and progress payments.
Government Bid Proposals: What’s Different
Public projects—federal, state, county, municipal—follow strict procurement rules. The RFP tells you exactly what format to use, what forms to submit, and what certifications are required. Your job is to follow instructions perfectly. Creativity loses. Compliance wins.
Key Differences for Government Bids
SAM registration is mandatory. You can’t bid on federal contracts without an active registration in the System for Award Management at SAM.gov. It’s free but takes time to set up. Make sure your NAICS codes are correct—they determine which contracts you’re eligible for.
Attend the pre-bid meeting. These are almost always mandatory for public work. If you don’t show up, your bid gets rejected. Even if attendance is optional, go anyway. The questions other contractors ask reveal concerns you might have missed. Take notes.
Davis-Bacon compliance for federal projects. If the project is federally funded and over a certain threshold (usually around $2,000), you must pay prevailing wages. Your proposal should state that you understand this requirement and have a process to track and report certified payroll weekly. Including a compliance officer in your team structure shows you’re serious.
Sealed bids vs. negotiated proposals. Some public projects use sealed bidding—lowest price wins if you’re qualified. Others use a two-step process: technical proposal first, then price. Know which one you’re dealing with. If it’s negotiated, your technical approach and qualifications matter as much as price.
Cure periods don’t always exist. In private work, a client might call you if your bid has a minor error and give you a chance to fix it. In public procurement, a missing signature or incorrect form often means automatic disqualification. There’s no phone call. Build a checklist and have someone else review your package before submission.
Residential Bid Proposals: What Homeowners Need to See
Residential bids are less formal than commercial or government proposals, but homeowners are often less experienced at reading construction documents. That means clarity and reassurance matter more than technical jargon.
What Homeowners Care About Most
What’s included and what’s not. Spell out exclusions in plain language. If your kitchen remodel bid doesn’t include appliances, say: “Appliances supplied and installed by owner. We will coordinate delivery and provide rough-in connections.” Don’t assume they know what “owner-supplied fixtures” means.
How you handle surprises. Remodels almost always uncover something—rotted framing, outdated wiring, plumbing that’s not to code. Homeowners fear the surprise invoice. Address it upfront with a discovery protocol: “If we encounter unforeseen conditions, we’ll stop work, document the issue with photos, provide a fixed-price quote for the additional work, and wait for your written approval before proceeding. No surprise charges.” That builds trust.
What happens during construction. Homeowners live in the space. They want to know: What time do crews arrive? Will there be dust? Can they use the kitchen? Where do workers park? Addressing logistics in your proposal shows you’ve thought about their daily life, not just the work.
Payment schedule that feels fair. A 50% deposit upfront feels risky to homeowners. Break it into smaller milestones tied to visible progress: 10% deposit to secure the schedule, 30% at demo and rough-in complete, 30% at drywall and finishes start, 25% at substantial completion, 5% final payment after punch list. That aligns payments with value delivered.
Allowances and Selections
Homeowners often haven’t picked tile, light fixtures, or cabinet hardware by the time you’re bidding. Use allowances—placeholder amounts based on mid-range pricing. Be specific: “Tile Allowance: $8 per square foot installed, based on selecting from [supplier name] mid-range inventory. Upgrades or downgrades will adjust final cost accordingly.”
This keeps the project moving and avoids the “champagne taste, beer budget” problem where they fall in love with $40/sf stone when you priced $8/sf ceramic.
Common Mistakes That Get Bids Rejected
Most rejected bids fail on technicalities, not pricing. Here’s what to avoid.
- Missing or Incorrect Forms: If the RFP requires a specific bid form, use it. Don’t recreate it in your own format because it “looks better.” Procurement officers are checking boxes. If your bid doesn’t match the checklist, it’s out.
- Unsigned Documents: Every form that requires a signature needs one. Sounds obvious, but it’s a common disqualifier. Some RFPs require a notary. Some require signatures from specific company officers. Read the instructions.
- Expired Certifications or Insurance: Your contractor license, insurance certificates, and bond must be current as of the bid due date. If your general liability expires the day before bid opening, your bid is invalid. Check dates.
- Vague Scope or Pricing: A lump-sum price with no breakdown makes clients nervous. What are they paying for? A 47-page spreadsheet with every nail itemized is overkill. Find the middle ground: enough detail to show you’ve thought it through, not so much that it’s overwhelming.
- Math Errors: If your line items don’t add up to your total, evaluators will either reject the bid or use the unit prices to recalculate your total—which might not be the number you wanted. Double-check your math. Triple-check it.
- Late Submission: Bid deadlines are hard stops. If the RFP says bids are due by 2:00 PM on May 15th, that means received by 2:00 PM, not postmarked or sent. Aim to submit at least a few hours early. If you’re hand-delivering, account for traffic and building security.
How to Structure Your Pricing to Win Without Leaving Money on the Table
Pricing isn’t just about covering costs and adding margin. It’s about positioning. Low price wins only when all else is equal—and it rarely is.
Use Tiered Pricing for Flexibility
Offer a base bid that meets the minimum RFP requirements, then add alternates for enhancements or cost savings. Example: “Base Bid: Asphalt paving, $120,000. Alternate Add: Concrete paving upgrade, add $45,000. Alternate Deduct: Reduce parking area by 20 spaces, deduct $18,000.”
This gives the client options and shows you’re thinking about their budget constraints.
Price Risk Separately
For remodels or projects with unknowns, don’t bury contingency in your overhead. Call it out as a line item with a specific purpose: “Existing Condition Allowance: $8,000 for unforeseen structural or code compliance issues discovered during demolition.”
If nothing goes wrong, you can return the unused portion or apply it as a credit. That’s a better story than explaining a change order.
Don’t Race to the Bottom
If you’re 20% higher than competitors, you’re probably missing scope or underestimating. But if you’re 5-10% higher and your proposal shows better risk management, tighter schedule, or stronger safety record, you can still win. Clients choose value, not just price. For more on protecting margins, see our guide on managing construction cash flow.
Submitting Your Bid: Final Checklist
Treat submission like a phase-gated process. One missing item disqualifies an otherwise perfect bid.
Pre-Submission Checklist
- Review the RFP instructions one more time. Confirm submittal format (electronic or hard copy), number of copies required, delivery method, deadline
- Run a completeness check. Create a checklist of every required document, form, and certification. Go through your bid package line by line and check them off
- Verify all signatures and dates. Make sure every form that needs a signature has one, and dates are correct
- Check your math. Add up all line items. Confirm subtotals match the grand total. Recalculate unit pricing
- Proofread for typos and errors. Spelling mistakes and wrong project names make you look careless
- Get a second set of eyes. Have someone not involved in preparing the bid review it against the RFP checklist
Submission
For electronic bids: Upload early. Don’t wait until 10 minutes before the deadline. Portals crash. Internet goes out. Upload at least two hours early, then screenshot the confirmation page with timestamp.
For hard-copy bids: Use a tracked delivery service (FedEx, UPS) and save the tracking number. If hand-delivering, go the day before if allowed, or leave extra time for traffic and building security. Get a stamped receipt showing date and time received.
Sealed bids: Follow the sealing instructions exactly. If the RFP says “Submit in a sealed envelope marked ‘BID – DO NOT OPEN’ with project name and bid number on the outside,” do exactly that. Don’t get creative.
What Happens After You Submit
For government bids, there’s usually a public bid opening where all submitted bids are read aloud. You’ll find out who else bid and what their prices were. For private work, you might not hear anything for days or weeks.
If you win: Confirm the award in writing. Ask about next steps—contract execution, insurance updates, pre-construction meeting. Don’t start work until you have a signed contract and notice to proceed.
If you lose: Ask for feedback, especially on public projects. Many agencies will tell you where your bid fell short—price, experience, technical approach. That information is gold for the next bid.
If you’re close but not lowest: Sometimes the low bidder gets disqualified or withdraws. Stay responsive. Projects sometimes get awarded to the second or third bidder weeks after the opening because the winner couldn’t provide bonding or had a licensing issue.
This guide provides general information about construction bid proposals as of May 2026. Bid requirements vary by project type, jurisdiction, and client. Always follow the specific instructions in the RFP or solicitation document. Information is for educational purposes and does not constitute legal or business advice. Consult with a construction attorney or business advisor for guidance specific to your situation. For additional resources, visit the U.S. Small Business Administration and Associated General Contractors of America.
Frequently Asked Questions
A construction bid proposal is a formal document that includes your price, project plan, timeline, qualifications, and contract terms. It's your complete offer to execute the work, showing the client you understand the scope and have a plan to deliver it successfully.
A standard construction bid includes: cover letter, company qualifications, detailed scope of work, cost breakdown, project schedule, methodology and approach, terms and conditions, and attachments (insurance, licenses, references). Government bids follow strict RFP formats. Residential bids are less formal but cover the same basics in plain language.
Start by reading the RFP or project requirements thoroughly. Then structure your proposal with these sections: cover letter, company overview, scope of work, cost breakdown, schedule, project approach, terms and conditions, and required attachments. Be specific about what's included and excluded. Provide proof of your experience with similar projects. Follow all submission instructions exactly.
Every construction bid should include: detailed scope of work, itemized cost breakdown (labor, materials, equipment, subs), project schedule with milestones, payment terms, warranty information, insurance certificates, contractor license, and references. For government work, add required compliance forms, bid bonds, and certifications.
Focus on what you can prove: any related trade experience, training or certifications, partnerships with experienced subcontractors, and a detailed plan showing you've researched the work. Start with smaller private jobs where relationships matter more than track record. Be honest about your experience level but confident in your ability to deliver. Consider bonding through the SBA Surety Bond Program if you lack a track record for public work.
The terms are often used interchangeably, but technically: a "bid" is your price response to a specific solicitation (common in public procurement). A "proposal" includes price plus your technical approach, qualifications, and plan. In practice, most construction "bids" are actually full proposals that include both pricing and a project plan.
Length depends on project complexity. A simple residential remodel bid might be 3-5 pages. A commercial project could be 15-25 pages. A major government contract might require 50+ pages with appendices. Follow RFP page limits if specified. Otherwise, include enough detail to prove competence without overwhelming the reader. Quality and clarity matter more than length.
For lump-sum contracts, no—provide total costs by phase or deliverable, not hourly rates. For time-and-material contracts, yes—state your labor rates by classification (foreman, journeyman, laborer) plus equipment rates and markup on materials. Government bids often require detailed unit pricing. Residential clients generally prefer bundled pricing without seeing your internal rates.
Be specific. Instead of "We have experience with similar projects," say "We completed three occupied school renovations in your district in the past two years, all delivered on-time with zero safety incidents." Address risks the client hasn't mentioned. Provide references with contact info. Use clean formatting. Follow instructions perfectly. Show you've thought through logistics, not just pricing.
A bid bond is a guarantee (usually 5-10% of your bid amount) that if you win the contract, you'll sign it and provide the required performance and payment bonds. It protects the owner from bidders who withdraw after winning. Bid bonds are almost always required for government work and common on larger commercial projects. You get them from surety companies—shop around because rates vary. The Associated General Contractors of America provides resources on bonding requirements.